Understanding Back Window Replacement
What is Back Window Replacement?
Back window replacement refers to the process of removing a damaged or broken rear windshield and installing a new one. This procedure is essential for maintaining structural integrity, vehicle safety, and aesthetic appeal. The rear window, often constructed from tempered glass or laminated glass, plays a crucial role in protecting passengers and providing visibility while driving. Ensuring the back window is in good condition is vital for the overall functioning and safety of the vehicle. For those considering this process, reliable resources can help guide you through the essential techniques and standards involved in Back window replacement.
Common Reasons for Replacement
Several factors can necessitate the replacement of a back window. Here are some of the most common reasons:
- Accidental Damage: Collisions, even minor ones, can cause cracks or shattering of the back window. Objects striking the glass can also lead to damage.
- Weather-related Issues: Severe weather conditions, such as hail or severe temperature fluctuations, can weaken or break the rear window.
- Vandalism: Acts of vandalism may involve breaking the back window, which necessitates immediate replacement.
- Wear and Tear: Over time, the elements can cause the glass to degrade, resulting in scratches or chips that may need repair or replacement.
- Installation of New Structures: Modifications to the vehicle, such as adding a rear wiper or camera system, may require a different type of back window.
Signs You Need a Back Window Replacement
Being aware of the signs that indicate a back window replacement is necessary can help you avoid further complications. Here are some key indicators:
- Visible Cracks or Chips: If your back window has a significant crack or chip, it may impair visibility and weaken the structure.
- Water or Air Leaks: Persistent leaks inside the vehicle can suggest a failed seal, often requiring whole glass replacement.
- Obstructed Visibility: If damage obstructs your view while driving, it’s crucial to replace the window for safety.
- Deformed Glass: Warping or distortion in the glass indicates that it may no longer provide adequate protection.
- Excessive Noise: Unusual wind noise during driving can indicate insufficient sealing or damage to the glass.
Preparing for Back Window Replacement
Tools Required for the Job
Proper preparation is essential for a successful back window replacement. Having the right tools enhances efficiency and effectiveness. Common tools needed include:
- Glass cutter or knife
- Window suction cups
- Utility knife
- Flathead screwdriver
- Sealant or adhesive gun
- Tar removal solvent
- Safety gloves and eyewear
- Measuring tape
Choosing the Right Glass Type
Selecting the appropriate glass type is pivotal. Depending on your vehicle and personal requirements, you may have a few options:
- Tempered Glass: Often used in the back of vehicles; it breaks into small, blunt pieces, minimizing injury risks.
- Laminated Glass: Composed of multiple layers, this type offers enhanced security and protection against break-ins.
- OEM Glass: Original Equipment Manufacturer glass provides the best fit and quality, matching the vehicle’s specifications.
- Aftermarket Glass: While often cheaper, ensure it matches the required standards to prevent issues during installation.
Safety Precautions Before Starting
Safety should always be a priority. Here are some precautions to take before starting the replacement:
- Wear safety goggles to protect your eyes against glass shards.
- Use gloves to prevent cuts while handling glass.
- Ensure the area is clear of debris and obstacles to provide a safe workspace.
- Confirm that the vehicle is parked on a flat and stable surface.
- Have a first aid kit on hand in case of emergencies.
The Back Window Replacement Process
Step-by-Step Installation Guide
The installation process involves multiple steps, which are crucial to ensure that the new back window is correctly and securely installed:
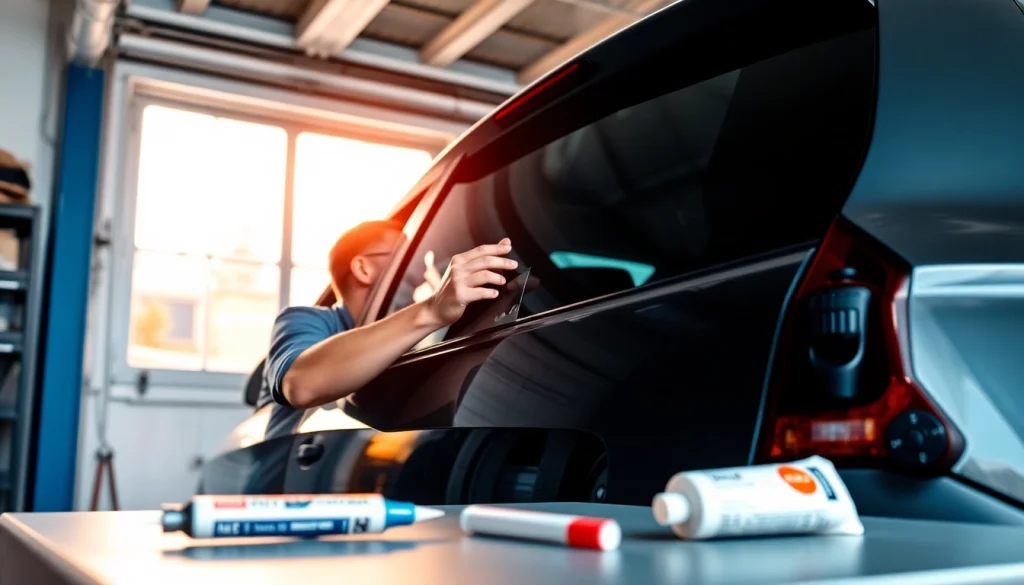
- Removing the Damaged Glass: Carefully cut the urethane seal using a utility knife and remove the old glass using suction cups.
- Cleaning the Frame: Use tar removal solvent to clean the bonding surface, ensuring no residue is left behind.
- Applying New Urethane Adhesive: Use a caulking gun to apply a new layer of urethane adhesive around the frame.
- Positioning the New Glass: With the help of suction cups, lift and position the new window in place.
- Securing the Glass: Press the glass firmly against the adhesive, ensuring an even contact across all edges.
- Final Checks: Verify the alignment of the glass and clean any excess adhesive before it cures.
Sealing and Finishing Touches
After installing the new back window, proper sealing is critical to prevent leaks and ensure durability:
- Allow the adhesive to cure according to the manufacturer’s recommendations to ensure a strong bond.
- Inspect the perimeter of the installation for gaps in the sealant and apply additional adhesive if necessary.
- Clean the surface of the glass thoroughly to remove any fingerprints or residue.
Ensuring Proper Adhesion
Proper adhesion is vital for the safety and longevity of the back window. Here are essential tips:
- Ensure that the surface of both the glass and the vehicle frame is clean and dry before applying adhesive.
- Follow the manufacturer’s instructions regarding curing times and the position of the vehicle to facilitate proper adhesion.
- Do not drive the vehicle for a minimum of one hour post-installation to allow the sealant to set
Costs Associated with Back Window Replacement
Typical Price Range for Replacement
The cost of back window replacement can vary significantly based on several factors. On average, you can expect to pay between $200 to $600 for replacement. Factors influencing this range include:
- The type of glass chosen (OEM vs. aftermarket).
- Labor costs in your area.
- The make and model of your vehicle, which affects part availability.
- Any additional repair work needed to fix the frame or surrounding areas.
Factors Influencing Cost
Several elements will impact the overall cost of back window replacement:
- Vehicle Type: Luxury or rare vehicles typically incur higher costs due to specialized parts and labor.
- Geographical Location: Labor rates can vary substantially based on local market conditions.
- Optional Features: Additional components like heated glass or defrosting mechanisms will increase costs.
Estimating Labor Costs
Labor costs for back window replacement can vary widely but often account for 50% to 70% of total expenses. To estimate accurately:
- Consult multiple auto glass repair shops for quotes.
- Factor in the complexity of the job—labor rates may be higher for vehicles with advanced technology.
- Check reviews to find reputable service providers to ensure you receive quality work.
Post-Replacement Care and Maintenance
How to Care for Your New Back Window
After replacing the back window, maintenance is key for longevity:
- Allow 24 hours for adhesive to cure before washing the vehicle.
- Use gentle, non-abrasive cleaners to avoid scratching the new glass surface.
- Avoid driving on rough roads for a few days to ensure the glass remains properly set.
Common Issues to Watch For
Be vigilant for any signs indicating issues with the newly installed glass, including:
- Visible cracks that appear shortly after installation.
- Water leaks or condensation inside the vehicle.
- Unusual noises during driving that may indicate improper sealing.
When to Seek Professional Help Again
If you experience any of the aforementioned warning signs, it’s crucial to seek professional assistance promptly. Additionally, if you have concerns about the quality of the installation or want peace of mind, a follow-up inspection by a professional can help identify issues before they escalate.